Feeds:
Posts
Comments

Archive for the ‘Details’ Category

If you live in the greater Phoenix-area, hopefully you’ve heard about the Junk in the Trunk Vintage Market. If not, well, now you know.

There is one tomorrow (Saturday, September 15th) at WestWorld in Scottsdale and I am SO EXCITED. I’ll be there with a group of girlfriends, Starbucks in hand, ready to find some great decor items for the Dream. Here’s what I’ve found in the past:
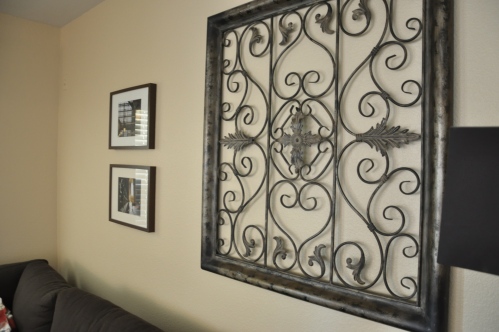
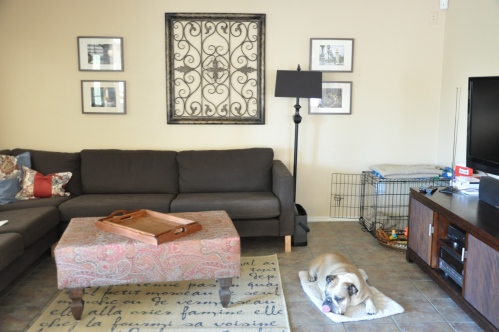
The iron wall hanging that is in our family room was the one and only item I purchased at my first Junk in the Trunk sale more than a year ago. It was about $40, which I thought was a great deal. Initially, I bought it to hang on our entry wall…
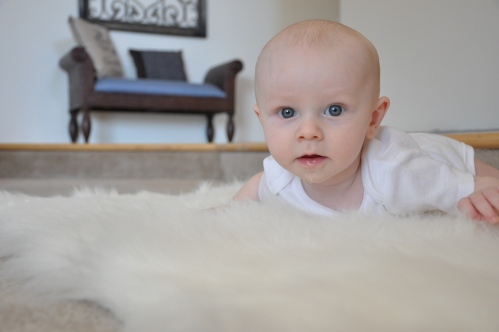
You can see the bottom of it in this shot of Kenton when he was four months old. MY BABY! Where has the time gone?! Seriously, they are only babies for approximately one nanosecond. WAH!!!!

Anyway, it’s now in the family room and I like it there for now.

Eventually, I’d like to get the four photos around it printed on 16×20 canvases. Currently, they are 8×10 photos in 16×20 frames. I think that size adjustment will look better on that wall.

Bowdoin the Bulldog, however, is not impressed. Shocker. Oh, and ignore the hot mess over there on the right – more on that in a minute.

So, at the last Junk in the Trunk Vintage Market a few months ago, I scored a few more sweet things for the Dream. I blogged about that here.

Fun. Fun.

Tomorrow, I’m on the hunt for at least three things. (The at least is a disclaimer for Mr. Dreamer – just so he knows if I find more than three things, I’m not breaking any promises. It’s only at least three… I’m actually hoping to find more.)

Back to the hot mess…
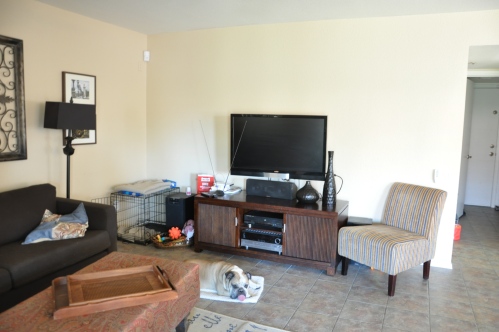
The wall where our TV is mounted is arguably the most boring wall in the entire house. Again, Bowdoin is not impressed – and no one can blame him. At the JITVM, I’ll be searching for some kind of shelf/mantle to mount over the TV – and possibly some fun things to display on it. Ideally, I want something nearly as long as that wall, kinda chunky, and the same stain as the TV stand – I know, it’s a very specific list.
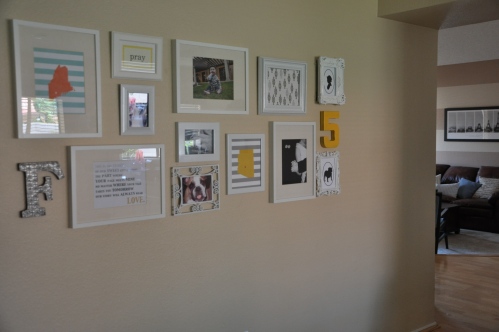
I’m also looking for a table to go under my gallery wall. A few weeks ago, the gals behind JITVM posted THE PERFECT table on Instagram and I commented that I had to have it! Well, I was just a couple of hours too late. Someone beat me to it. Boo Hoo! So, I’m hoping there’s something at tomorrow’s sale that’s even better.
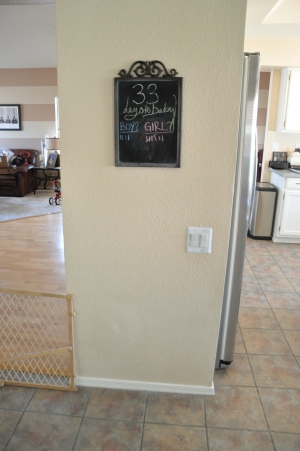
Finally (but not literally finally – see disclaimer above), I’d like to get a chalkboard to put on the bottom half of this wall – so Kenton can color on it. He’s a tad obsessed with his sidewalk chalk for the back patio, that he’s not allowed to bring inside. So, I thought that might be a practical and fun thing to add here. The chalkboard at the adult level we purchased in France right after we bought the Dream. Yes, that number is correct – 33 days to baby. I KNOW. Too fast, too fast.

See the Boy vs. Girl poll? Don’t worry, you’ll have a chance to cast your vote next week during PREGNANCY WEEK here on Our Dream Foreclosure.

So, anyone else heading to the Junk in the Trunk Vintage Market tomorrow? If so, comment and let me know! If you see me, say hi! I’ll be the one with the permagrin and beach ball tucked under my shirt. 🙂
Read Full Post »

Our gallery wall is growing…

I just love being able to add to this wall – and when baby #2 arrives, we’ll swap out some of the photos. But this one will stay…

The Kenton silhouette was a souvenir from the San Diego County Fair this summer.

There are approximately 400 million DIY tutorials out there for silhouettes. Or, you can pay the gal at the fair $15 to cut one for you – which is what I opted for. My Grandpa helped keep Kenton looking in one direction by playing his first birthday video, which he’ll watch over and over and over and over. Something about seeing himself on screen – he loves it.

She was also selling pre-done silhouettes of dog breeds. Of course, I couldn’t resist taking a Bulldog off her hands.

I found the white frames at TJ Maxx for $7 each.

The “5” was $2.50 at Hobby Lobby and I did a quick coat of spray paint we already had on hand. In case you’re wondering…

Jason + Michelle + Kenton + Baby + Bowdoin the Bulldog = 5.

The yellow is the same shade that accents Kenton’s nursery. I’ve decided to bring that pop of yellow throughout the house occasionally… in an attempt to tie things together a bit better.

I just love this wall. I don’t know why it took me so long to put it together in the first place!

However… Bowdoin is not impressed…

Hmph. I’m thinking about starting a “Bowdoin is not impressed” blog, like McKayla is Not Impressed. (Love that site!)

Bowdoin, by the way, is hanging out on the new rug in our family room (!)… more on that later.

Read Full Post »

I’ve been excited to share this project with you for MONTHS. No, it hasn’t been done for months, it’s been done for about five minutes. The closing ceremonies are on Sunday, so I kind-of waited until the last minute to actually do this project… but it’s been in my head for months.

Oh gosh, do those wheels make me happy.

As you know, we’ve been working on Kenton’s “big boy” room. It is going to have a cycling theme. So, I’ve been tossing around different ideas using bike parts in the room. I got this idea a while back and Jason initially tried to talk me out of it. Where would I get bike wheels? You’ll have to buy a whole bike (three bikes!) and just use the wheels? This could get expensive, quick. Yikes!

So, imagine my DELIGHT when I stumbled upon these beauties at my local thrift store…

Three bikes. $4.99 each. WHAT?! I know. You know what’s even better? I had a $10 off coupon. So, I got all three bikes for $5. YESITSTRUE. They all happen to be the same brand and size. The gal at the register guessed I was pregnant with triplet girls. I quite enjoyed telling here there was just one baby in my belly and these bikes were about to get stripped for an art project for my son’s room. Yep, she was confused.

I got home and could barely contain my excitement as I showed Jason what I found. He was impressed! You need to understand, Jason is a cyclist. but not only does he ride a bike for exercise and fun – it’s also his main hobby. He loves scouring eBay for deals on bikes and bike parts. Many times, he’s purchased incredible bikes for way below retail, stripped them and re-sold the parts via eBay for a hefty profit. We have an ongoing agreement… I don’t care if he spends $2,000, $3,000 or even $5,000 on a bike if he’s sure he can turn a profit off of it. He always does.

So, I had the right guy on my team to strip these girls down to just what I needed.

bike guts

6th wheel

That, my friends is the 6th wheel. I’m saving her for another fun project in the room – but you can see there the toughest parts to remove (thanks to rusty bolts) – the axel, bearings and cog. Once Jason was able to get those off, there was a ton of grease in that middle hole. We spent a couple of days going through cycles of spraying them down with degreaser, wiping, rinsing, letting them dry – before we felt they were ready for the next step…

The first step, once the wheels are successfully naked from all unnecessary parts, spray them down with primer.

Once they’re dry, which takes no time at all here in Arizona, you’re ready to apply the individual ring colors.

Since the Olympic colors are not colors I’m using anywhere else in this room, I opted for Krylon’s Short Cuts, mini spray paint cans:

Aren’t they cute?

Krylon, by the way, didn’t pay me for this post. I just researched spray paint and thought this product would be best. It worked out well. I had more than enough paint for each wheel. I also shopped around for the best price on these puppies, which I found at Hobby Lobby:

Two of the colors were $3.47 and the other three were $3.27. Not sure why red and yellow were more expensive, but still – that was the best price I found.

So, the obvious next step is to start painting the wheels/rings…

The front/back was easy. The sides, however, were a little tricky. At first, I thought the middle hole would fit over a wine or beer bottle, but they were a little small. So, I jerry-rigged three beer bottles through the spokes to hold the wheels just far enough off the ground that I could spray the entire side in one try.

Bonus – after, you have artsy painted beer bottles (which went straight back into the recycling bin!).

With all sides of the wheels painted…

I let them dry for a few hours. Again, the Arizona summer “dry” heat is fantastic for fast drying. It’s not fantastic for late-term pregnancy, but I digress.

Once they were ready, we did a quick Google image consult to check the proper order… then we simply nailed them to the wall, really close together.

Since Kenton’s big boy room is not ready for these rings yet, they are being temporarily housed in the playroom. Before we move them, we’ll be looking at different methods of hanging. This isn’t necessarily the most secure – especially for a curious little boy! Anyway, here’s what they look like right now in the playroom… so you can see the size….

Yes, that’s my little “Made in the USA” future Olympian down there chasing a ball…

We’re hoping he goes for the gold someday in cycling – but his current obsession with balls may indicate another sport interest. We shall see.

Okay, here’s the budget breakdown for this project:

Bikes = $5 ($4.99 each with a $10 off coupon)

Spray paint primer = Already had

Mini spray paints = $16.75

TOTAL = $21.75

Crazy, right?!

What do you think?! Anybody else do an Olympic-theme DIY project this week?

Read Full Post »

The playroom is still (very much) a work in progress, but it is starting to come together…

I have put very little money into this room, which is awesome. That’s thanks, in part, to some pretty lucky thrifting finds…

I scored that little kid-sized table at Goodwill for less than a latte. Yep! Just a little bit of sanding, primer and paint…

And she was good to go…

I’m still on the hunt for two or three kid-sized chairs to go with it. I’m determined to find wooden ones for cheap… and I’m willing to wait! Which is fine as Kenton is still a bit young to actually sit at the table and do something productive.

We painted the table the same color blue as our downstairs bathroom, which is right across the hall from the play room. Also that shade of blue? The diaper storage shelf (former dish display rack) that I picked up for $12 at the Junk in the Trunk Vintage Market:

Remember what that first looked like?

It’s not quite finished either. I’m going to add a colorful fabric with elastic around the bottom shelf to hold those diapers in and add some more color.

The changing table is also a second-hand find.

We found it at a local kid’s consignment store for $30! That is so much cheaper than buying one new and even less than I could find on my local Craig’s List. And it TOTALLY beats the makeshift table we were using for a few weeks:

Pretty bad, no?

You may recall, even some of the fabric used in the embroidery hoop art is from a thrift store…

See this post for more on that.

Finally, I made a really fun find at a thrift store in Del Mar, California last week:

These sweet little mirrors – and elephant and a hippo were just $2 bucks each. We still need to find a special toddler-height spot for them, but I’m sure we will soon.

Also coming soon:

  • Replacing the non-child-safe curtains and blinds with a valance and safe blind
  • New bedding for the daybed (currently, our former guest room queen-sized duvet is making an awkward cover up)
  • Perhaps a fun paint job… (don’t tell Jason!)
  • Area rug (the carpet is taking quite a beating!)
  • DIY coloring book display rack
  • More art/wall hangings
  • ANOTHER BABY! 😉

Read Full Post »

I whipped together a little sewing project this weekend. This was not Pinterest-inspired. I repeat, I sewed something that was not seen first on Pinterest. I know, stop the presses. This is for real.

See the polka-dots? (Nope, we can’t get enough!) It’s a chewable cover for the bar on our stroller.

You see, we had a problem.

Young sir likes to chew on things. Teething or no – he’s a chewer.

Despite my attempts to thwart this behavior and provide alternative chewing surfaces, the bar across the front of our UPPAbaby Vista stroller was just too tempting.

See? Chewed to bits.

It was so bad, we would come home from walks and I would find bits of black foam stuff in Kenton’s mouth and in the folds of his neck. NASTY.

I took to covering the bar with a dish towel for a while.

That worked for short walks, but on long walks, the bambino would get bored and unravel the towel to get to his beloved teething surface.

It also made for a good pillow. This shot was taken during an outing to the farmer’s market – a thinly disguised distraction from stretching this kid to one nap/day. GOOD TIMES.

So, I needed a better solution. Not to mention one that looked better than a ratty, old towel.

I had this fantastic fabric sitting around.

I bought a yard of it to possibly use in the nursery, but the black background didn’t quite fit in, so it was never used. However, it’s a perfect accent to our silver and black stroller.

Next, I needed to alter the fabric so that Kenton could gnaw on it and not break through the fabric. So, I did some googling on how to create oil cloth – which, if you do the old-fashioned way, takes a lot of time and effort – neither of which interested me. Instead, I took the easy way out.

I used this iron-on vinyl.

After that was set and cooled, I took another easy way out and ironed-on some no-sew hemming around all the edges…

Next, I sewed on some velcro… which I don’t have photos of because it got a little messy, to be honest – and I was in a bit of a hurry. Honestly, if I had to buy velcro for this project, I would have cut another corner and gone for the iron-on version and made this a no-sew project. However, I had some on hand, so I just put it in place with a few stiches.

Then, I slapped that new cover in place and Kenton gave it a once-over.

Thumbs up!

This is just in time too… as you read this, Kenton and I are making our way across the desert to the Promised Land.

Promised Land = San Diego

We’re heading to paradise for the week with my mom for some oceanside R&R. We’ll be using the stroller a lot – daily walks to Starbucks and the beach, the fair, possibly the zoo, new Children’s Museum, visiting family. Oh yeah! And no black foam bits will be found.

This here blog will not be neglected. I’ve still got daily posts for you – some projects from the Dream and some updates from Cali. Hope you have a great week!

Read Full Post »

We’ll wrap up two weeks of birthday-related blog posts with a quick mustache roundup…

Our first birthday theme all started when we decided to do a fake mustache as the final addition to Kenton’s monthly photo project.

So, he went from just a diaper to growing a ‘stache in 12 short months…

Read more about his monthly photos here.

That was the catalyst for the first birthday party theme… a ‘stache bash. For which, we did a Pinterest-inspired invite…

Learn all about his birthday party invites here.

His party was a hit! We recapped it all here, but check out a few highlights:


So, there you have it. A roundup of mustache madness for your Friday! Have a great weekend!

Read Full Post »

I cannot believe my baby is almost one! I literally broke into tears yesterday at 9:00 AM, because my water broke at that time on Memorial Day last year. Ahh, memories!

Kenton’s birthday is on Thursday and his party is on Saturday. So, it’s BIRTHDAY week on the blog! Hope you like cute blonde baby boys and mustaches. 🙂

The invitations have gone out and we’re having a mustache party! I’ll share all the details soon… Right now, I’m busy getting ready…

I’m making bunting. Cutting more mustaches than I ever imagined. Finalizing the menu. Cleaning (HA! Called back the cleaners I had to fire for one last hurrah!). Oh, and we’re frantically trying to finish our big painting project…

Can you see me and my baby bump in this really terrible, unedited photo?!

Thank you for all of the tips and suggestions you gave in answer to my cry for help last week. We finally figured it out – after much cursing and gnashing of teeth. The lines are straight and the paint is drying – we still need a second coat and it’s a HUGE bummer that Jason’s back decided to give out before the job was done. So, that’s going to be interesting! But, we will get it done – even if I have to cover it in mustaches.

Read Full Post »

My dear friend, Abby, is having a little mini-Dreamer of her own.

So, of course, she needs to be showered with baby gifts.  So, a few of us got together and did a little soiree a few weeks ago.  We had a loose “cookies and milk” theme.  Here are some highlights:

Abby's last name starts with "O" and the baby is lovingly referred to as "Little O." So, the name tags had every guest declaring their love for "Little O" (a cheerio!).

Carrie – the hostess of this partay – is my super-creative friend. You know, the friend that constantly inspires you and frustrates you at the same time because you’ll never keep up with her Martha-Stewart-prowess? Here she is with the guest of honor:

 She came up with this fabulous idea to create onesies for Abby to use for her baby’s monthly photos:

It was a bit tricky because Abby and her husband are waiting on a delivery room surprise (like us!), so Carrie tried her best to choose gender-neutral fabrics.

As the guest activity, we had people write down notes for each month, that we then wrapped up in the onesies.

So, when Abby grabs the appropriate onesie each month, she’ll have a sweet note of encouragement from her friends to go along with it!

This is also the gal who got the shower caddy diaper storage project I told you about on Monday.

She’s registered for green bedding from Pottery Barn Kids. I stopped by the store and got a swatch of their fabric and then headed to Home Depot to match a spray paint to it. I think it came pretty close:

Anyway, Abby was really happy with it and texted a picture of it hanging above her changing table.

This was a great gift idea – but I wouldn’t do it for just anyone.  I knew Abby had some empty wall space in her nursery and this piece would fit right in.  I also know her personality and that she’s open to suggestions and did not have specific ideas already planned for every aspect of her nursery (like, eh-hm, some others I know, yours truly not excluded). So, if you’re thinking about something similar – just make sure you know it will be well received!

Here’s the gang responsible for the shower:

(Yes, I already have a baby bump! Crazy.)

It was a fun day and, most importantly, Abby felt loved.  So, in my mind that = success.

PS: Carrie and Genevieve (pictured above, next to me) own a business called Red Dutch Door.  For those in the Phoenix area, they will have a booth at the Junk in the Trunk Vintage Market on May 5th at WestWorld in Scottsdale.  Don’t miss it!  It’s going to be awesome.  The last sale they went to, they were the most popular (by far) and most of their products were sold quickly.  They make subway signs (the “love is all you need” pictured above is an example), bunting, scarves, wreaths and rumor has it – they’ll also have some bike baskets.  So fun.

Read Full Post »

Okay, I’ll admit it.  This post is born out of guilt.

First, I confess – I’m amazing.  It’s true.  Okay, that’s a lie.  It’s my mom that’s amazing, but I’m her off-spring, so maybe I get a bit of the awesomeness in my DNA?  Anyway, while perusing Ikea during the nursery-shopping-frenzy pre-Kenton, my mom spotted a fantastic magazine wall rack and thought it would make for good diaper storage.  Boy, was she right!  With a little silver spray paint, this puppy fit perfectly into the nursery and is an awesome spot for diapers.  It holds about 200 diapers – all within arm’s reach of the changing table.  Various pictures of it have popped up all over Pinterest, which I loved because it’s a cheap and fun nursery addition.  Until, dumb Ikea stopped carrying it.  I have no idea when that happened, but it happened.  BOO!!!  I felt really bad.  I did Google, eBay and Craig’s List searches for people who asked me about it.  For a time, there were a few out there to be found.  (If you’re lucky, it’s called the Ikea Allamala Magazine Rack.)

Image

So, I promised to do some searching/digging/crafting on my own and come up with some alternative solutions, which I (finally) have for you here.

We’ve got baskets, magazine racks, floating shelves and shower caddies – yes, shower caddies!

Who knew that creative diaper storage could come from such random objects?

First up: the shower caddy.

I actually loved this one so much, I spray painted it and gave it away as a baby shower gift.  I matched (or tried to) the color in the bedding my friends had registered for – gave this puppy a coat of primer and two coats of green spray – and voila!

more on this baby shower gift later this week!

This piece holds about 100 diapers.  I found it at Marshall’s and it cost me less than $20 (+spray paint and diapers!).

Next up: the magazine rack.

Imagine this with a coat of bright blue or yellow?  This is a nice piece too because as baby grows, it can be repurposed for coloring books (which is exactly why I didn’t return it as originally planned.  It now has a reserved spot in our new playroom!).

Next, some simple items you may already have or can find anywhere for CHEAP: a basket and a floating shelf.

Again, image these painted in a nursery accent color – perfect!  These also can be repurposed when the bambino is potty trained.

So, there you have it – a few alternative and creative ideas for diaper storage.  What do you think? Anything here you would use – or do you have another item you repurposed for diaper storage?  Do share!

Read Full Post »

Last week, I reminded you how awful our master bedroom used to be.  I’m very happy to report it looks much better now.

Right?!

We finished this room a while ago, but never showed off any pictures.  Probably because it’s never as clean as you see it above.  Except for the day the cleaner’s come… which is when I snapped these pictures…

Complete product list is below… but everything in the room is new.  EVERYthing.  Umm, because it really needed it… did you see the before picture up there?!

Here’s some tight shots of what we have on display on our dressers:

hers

On mine, wedding pics and a magnifying glass from the realtor who sold us our house.  He died a few weeks later.  As he knew he was dying, he instructed his wife to get us that magnifying glass – as a symbol that we should always seek to look deeper into God’s Word.  She gave it to us after he died and, needless to say, it is incredibly special to us.

his

On Jason’s side, he has an original piece of art by my mom.  She painted that while we were skiing at Whistler/Blackcomb on our second wedding anniversary in 2010.  He also has a framed piece by yours truly.  It’s a bunch of words, phrases, dates, names, etc… that are very personal to us as a couple (which is why it’s blurred!).  That was an easy, cheap and special gift I gave him a couple of years ago.

And another look at the AFTER…

Okay, here’s the list of everything you see…

Furniture – Malay Collection @ Cost Plus World Market (bed, nightstands and two of the short dressers, which they no longer sell)

Duvet Cover and pillow shams – Clover @ West Elm (no longer available – sad face)

Rug – @ West Elm (also no longer available, we got it on clearance)

Throw – @ Ikea (I snagged it for $9.99, but can’t find it on their website)

Paint – Software (dark) and Online (light) @ Sherwin Williams (fantastic colors for a blogger, no?)

Blue vases (one on each dresser) @ HomeGoods

Lamps – Crate & Barrel (looking at them now, I think I need to peruse Pinterest for some new DIY shade options)

Standing mirror/jewelry box @ local furniture consignment store

Iron Leaf Art – @ Kohl’s

The Kiss (above bed) – the one item from his bachelor pad Jason was permitted to bring into our marital home. 🙂

I’m not including prices on this list, because everything is sorely outdated.  We finished this room more than a year ago and I’m just now showing it off!  Hmm…. I wonder what could have kept me pre-occupied?  Oh yeah, must have been that cute nursery and its primary resident. 🙂

Read Full Post »

Older Posts »